Feeds:
Posts
Comments

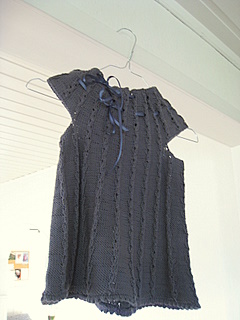
Pattern: Tunika til tøsen by Lene Holme Samsøe

Yarn: Lerke from Dale of Norway, colour 5063, 4 balls

Needles: Eeh, 3.5 mm??

Modifications: I skipped the crocheted edging around the armholes, and replaced crochet with a knitted picot hem at the bottom.

My attention was drawn to this pattern when someone requested a translation from Danish to English at Ravelry. I have always loved the clean crisp lines so often seen in different kinds of Danish design, and knitting designer Lene Holme Samsøe is no exception. There are several models from her books I’d love to knit!

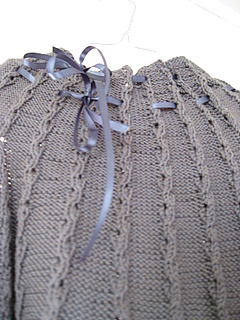
This was a great knit and I love the simple construction starting at the neckline with increases and faux cables on a garter background. The neckline is simply gathered with two matching ribbons and drawn together to fit. My crochet skills were not up to what was needed for the edging but I’m quite happy with how the piece turned out with a picot hem at the bottom instead. Plus, I just managed to use up what I had in my stash of this yarn, buying only one ball extra and using it to the last metre. Me like!

Danish and Norwegian are very similar languages but sometimes you are in for a surprise…’tunika til tøsen’, in Danish meaning tunc for a little girl, will by a Norwegian be interpreted as ‘tunic for a harlot’. So. This tunic has already been gifted to a little girl, who can probably get good use out of it for several years as a dress, tunic and top, and the merino/cotton mix should be perfect year round. I foresee more of these in the future!

Before I forget

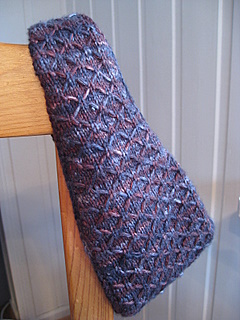
Pattern: 1331 headband, pieced together by myself. See below.

Yarn: Handmaiden 4 ply Silk Cashmere, colour ebony. Work weighs 27 g.

Sock/fingering or light DK yarn would work for this. Wool, alpaca, or blends thereof would be lovely me thinks.

Needles: 2.5 mm
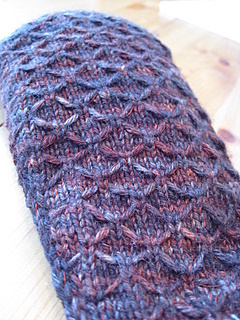
I’ve had this gorgeous yarn in my stash for several years meaning to make a shawl or arm warmers or something. Eventually I decided that the fine yarn of this fibre content would (maybe?) pill and stretch out of shape from the wear it’d get in handwarmers, and it didn’t please me when paired with the beautiful Hamamelis shawl which has been The Must Knit pattern on my mind lately. And when I looked at the subtle variegation in the yarn I kept thinking of the stitch pattern from the Leyburn socks that I love, imagining how perfect it would be for that texture. And thinking that I had been meaning to adapt the stitch pattern to a headband, and that I really need another headband because I completely depend on the one I bought on a holiday 5 years ago to keep my hair out of my eyes for all outdoor activities, and the lack of a 50 cent headband should I loose it will prevent me from using my kayak, and I really should use my kayak a lot because it cost way more than the headband but the more I use it the more I get for the money I paid or something.

So I knit a headband. It fits me perfectly and the yarn does not my sensitive forehead irritate. So I will most likely make more of these. Before I forget how to I will write down my pattern notes here, and you can make one too if you want. Here is how:

I call it the 1331 headband because you start with 13 stitches, increase to 31 and then decrease down to 13 again.

Note: First stitch of every row is slipped, always. This counts as a knit/purl stitch in pattern.

k – knit

p-purl

sl – slip stitch

wyif – with yarn in front of work

Cast on 13 sts. Purl one row. Then start slip stitch pattern:

Row 1: Sl 1, *k1, sl 5 wyif*  end k1.
Row 2 : Sl 1, purl to end.
Row 3: Sl 1, knit to end.
Row 4: slip 1, *p2, insert right needle under loose strand in front and lift it onto needle to the left of next st, p next stitch, let loose strand down, p3*

Row 5: Sl 1, k2, *k1, sl5 wyif; repeat from *, end  k4
Row 6: Sl 1, purl to end
Row 7: Sl 1, knit to end.
Row 8: Sl 1, purl 3, *p2, insert needle under loose strand in front and lift it onto needle to the left of next st, p next stitch, let loose strand down, p3* end p3

Continue until work measures 5 cm. Then increase by making one stitch (m1) inside the outermost stitch on each side on row 1, next time on row 5 and again on row 3 the next repeat. 6 sts increased/19 sts total.

Repeat increase section when work measures about 12 cm, and about 17 cm. There will now be 31 sts total. Continue knitting in pattern until work measures half your head circumference when appropriately stretched. Now calculate at what points to do decreases to match the increases on the first half: total length minus17 cm, 12 cm and 5 cm.

(Remember, knitting is flexible and nothing needs to be exactly on the centimetre. Adjustments can be made by knitting the last section shorter/longer than 5 cm before casting off).

Make a total of 3 decrease sections approximately matching the position of the increases on the first half. Decrease by ssk and k2 tog in each side respectively, one stitch in from the outermost stitch. First decrease at row 3 in pattern, then at row 1 and 5. Adjust pattern stitch accordingly as stitch count decreases.

You are now down to 13 stitches again. Cast off when work has reached desired length.

The slipped stitches give a nice selvedge along the work. Make an edging of applied I-cord by casting on 3 sts, then knitting two and knitting the third stitch together with a stitch from the selvedge. Tutorial found here. (I didn’t pick up the selvedge stitches first, just knitted them together with the third I-cord stitch as I got to them). The I-cord should pull the work slightly together.

Sew Cast on and Cast off edge together. Weave in ends and wear proudly.

(I haven’t test knit after these instructions, so if you do and it works, or if you try and end up with something else than a headband or find other errors, could you please send me an email?)


Row 1: *K1, sl 5 wyif; repeat to end of instep stitches, end k1.
Row 2 and all even-numbered rows: Knit.
Row 3: K3, *insert needle under loose strand and knit next stitch, bringing stitch out under strand, k5;
repeat from *, end k3.
Row 5: Sl 3 wyif, *k1, sl5 wyif; repeat from *, end sl 3 wyif.
Row 7: *Knit first stitch under loose strand, k5; repeat from *, end knit first
stitch under loose strand.
The main reason for blogging silence and loss of knitting mojo the past weeks have been a house move. There is nothing as revealing as being forced to go through the accumulated belongings gathered through a period of one’s life. The main part of my last seven years appeared to have been about books, yarn, shoes, outdoor equipment and hard liquor. I think I could have done worse although I’m not sure if the accumulation of liquor is a good sign or not. At least none of my passions accumulate perishables, although some of the UFOs  surfacing might have needed an expiry date.

I still haven’t gotten through and unpacked all my stash, as it turns out that yarn is an excellent box filler and pops out pretty much everywhere. Also I haven’t decided yet if it is a good idea to go public with all the unfinished objects. While I think about it I’ll cast light on a few small items that have gone by unnoticed and unblogged the past months:

Pattern: Bleiebukse (soaker) from the book Myk Start

Size: Brown 0-6 mo, stripey 6-9 mo

Yarn: 2-ply (I think) Bjørnegarn from Bånsull, about 50 g per soaker

Needles: 4.5 mm

The soaker is knitted flat, shaped with short rows and then seamed in one side. I actually found it easier to follow the pattern when I striped it cause it made it easier for me to see where to place the short rows. By no means is this a difficult pattern, it just seems that the simpler it is, the more likely am I to screw up sometimes. I haven’t got any user feedback but hope they are warm and comfy as one less baby litter the planet with paper diapers.

This lanolin yarn has actually been my only yarn purchase so far this year. You are now free to place your bets on how long my notbuyingyarnness will last.

A little thing from stash yarn, just under one ball of Lerke, colour 5063 to be exact:

Pattern: Grace lace beret

Needles: 3.5 mm

Modifications: Did a normal long tail cast on of 120 sts and knit 1×1 twisted rib, then followed pattern to end.

It is Very Difficult to take a picture of one’s head modeling a hat, and this was the best I could master. The beret is a thank-you gift to my office pal for brightening up my work week, and for lending me her car. I asked if I could knit her something in return and she picked this lovely little pattern. What else can a knitter do?

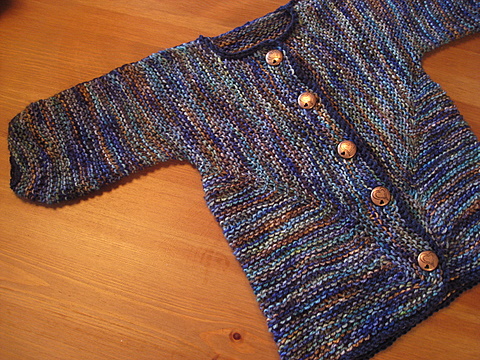
Pattern: really, this one doesn’t need and introduction..the classic Baby Surprise Jacket by Elizabeth Zimmermann

Yarn: Lovesticks sock yarn 80/20 merino/nylon,  colour Business Casual, about 80-90 g.

Needles: 2.5 or 3 mm… This is why I should keep a blog. If I don’t update my blog when I knit I don’t know what needles I’ve used for a project. I’ve seen worse consequences for less though.

Size: I’m guessing somewhere in the 3-9 month range, depending on the baby

Buttons from Knappehuset in Bergen.

I had no idea what was going on during this knit. Trust Elizabeth and just keep knitting.  The unfinished work looked like…well it didn’t look like anything really, just a weird shape and lots of garter stitch. Just keep knitting, just keep knitting (I have Dory from Finding Nemo in my head as I type this!). I think I was on the last ten rows when the lightbulb went on and I could see the jacket take shape. Always trust Elizabeth.

I finished off and crocheted around the the edges and along the sleeve seams with a dark blue that I think gathered and framed the variegated yarn well. This pattern works great with multicoloured/handdyed/handspun etc yarns but I like the tight look that blue accent added, it made a world of difference. Together with the golden buttons it makes me think of a uniform jacket. Wishing the wearer smooth sailing and good company on the long journey he just started!

Just Do It

Murano glass spindle from Butterflygirldesigns, fibre from Jessie

About a year or so ago I mentioned my first attempts at spinning. I bought a spindle and some fiber and played a little with it, I managed to make a thread that hung together, but mostly I admired the spindle itself, the craftmanship behind it, and the astonishing fact that all fabric ever made up until a few hundred years back was produced from spindle-spin yarn. I’m talking sheets for Egyptian pharaohs, and sails for Viking ships. Whoa.  That is a lot of spindle spinning! Hopefully I lived in a warmer climate in a previous life, cause I think I’d be behind inthe clothing department in spite of the Norwegian proverb stating ‘need teaches naked woman to spin’. Nothing is mentioned about naked men.

I’m ashamed to say my spinning productivity haven’t really boosted the past year, but after the initial playing and understanding the basic principle, I’ve now taken on my first real project. The fibre is a merino/bamboo/nylon blend and the intention is for it to become sock yarn. So far I’ve spun about…half? That is 60 g or 2 oz in half a year. But since this project is all about the learning process I like to think I’ve gotten more out of it than that.

What I’ve learned about spindle spinning so far

  • spindles are beautiful little tools and works of art, and spindle buying is highly addictive.
  • buying spindles/fibre/books instead of yarn doesn’t make my bank account any fatter.
  • I can get a lot done if I spin in those little moments, while waiting for the pasta water to boil and such.
  • a spindle can be used anywhere, and also left anywhere. I’m really inspired now but can’t for the life of me figure out where in the apartment I left it!
  • I can pack a lot more on the spindle if I lead the single around the bottom of the yarn cop before carrying it up over the whorl and to the hook. In the beginning I had to empty my spindle all the time cause the single just slid through the hook when I had a little yarn wound on.
  • If I grab the spindle at the lowest end, and at the thinnest point when I flick it, it spins longer and more evenly. (This has something to do with physics and force and momentum. I don’t know physics, just that it works and that is good enough for me).
  • I don’t need to put as much spin into the single as I can, to make durable sock yarn. Inspired by a Ravelry thread I’m now spinning my singles not very tight (not sure if I’m really underspinning, I am not experienced enough to tell) and then compensating for that by adding more twist in the plying process. In theory this should make sproingy yarn.
  • Chain (navajo) plying on the wheel is a great way to overcome the Fear of the Wheel.

The single is breaking on me both during spinning and plying but it is getting better. I had trouble overlapping fibre in the beginning (adding more when I was about to finish the bit of top I was spinning) but that is getting better too. I’m not so good at splicing the singles together but guess also that will come with practice.

I’m winding the yarn to a toilet paper core when the spindle is full ( and I can’t quite get over the transition in material and elegance from the stone and hardwood precision tool to a cardboard roll. As always, toilet paper rolls do the job, they are just not meant to be seen).Then, with the help from this brilliant video, I’m learning to chain ply the single on my wheel.

My first plied yarn,  about fingering weight. Can’t wait to see how it will stripe in a sock!

The number one thing I’ve learned though, is that there is only one way to learn how to spin, and that is to spin. The academic in me has read books, researched the web, read more, watched videos..but really, this isn’t about brain training, it is finger training. When I started spinning a few times a week I suddenly noticed that my fingers were adjusting, finding an easier and faster way to to what I needed to do, or I’d suddenly discover that I was automatically doing something I had trouble with earlier. I think this is what I find most fascinating with crafts, when you see a pair of hands making it look so easy, and then realize all the knowledge and experience living in those hands, and how no book can preserve that knowledge.

No, not the flash! Woman, make it stop!

I love knitting for babies. I love the satisfaction of a whole garment finished in a little time, with all the elements and details that an adult version would have. And often even more since the light weight and different user requirements gives room for new constructions more than they riddle the knitter with limitations. And most of all I love knitting for babies whose parents love knitwear.

It doesn’t always have to be a surprise either, so when a good colleague was well on her way I asked her f there was anything they would like  for the baby that hadn’t already been passed along from the first child.

Her answer? Something green with cables!

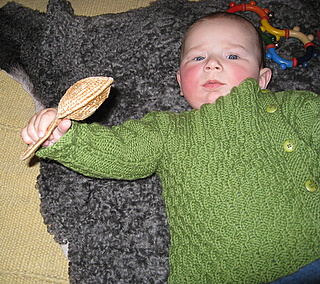
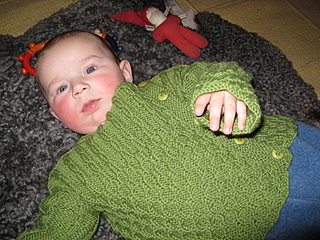
Pattern: Honeypie (Ravelry link) by Thorvalda

Yarn: Pt5 Sport, three balls green no 590

Needles: 3 mm

Modifications: The yarn was a bit thicker than the original yarn so to get something I vaguely assumed would fit the kid at some point between the 3 and 12 month mark I had to rip and cast on the body over 158 sts and make some adjustments to knit the jacket over fewer stitches.

The jacket is very very nice. It is also very practical for a baby, with the button band to the side minimizing risk of chewed off and swallowed buttons, and a good fit. It is also a relatively simple knit if you are experienced enough to follow a rough pattern that takes some shortcuts. The pattern is free so there is nothing to say about it, but the potential for being a good first jacket for a new knitter is so big that it is a little sad to see people give up on the explanations.

I see now that the pattern is no longer a free download, but for sale, so my above notes might not be valid!

I actually liked the back side of the buttons better than the front side, so I sewed them on inside out so to speak! I’ve seen this jacket getting so much wear and the parents praise how practical the garment is, machine washability, the wide neckline, and buttonband placement making it a winner. Kiddo seems happy too, but mostly interested in moving to placs he shouln’t be, and mostly too high above ground for his own good and his mother’s sanity.  Ah well, plenty of wiggle room in the jacket. I foresee more honeypies in my knitting future!

Stora Dimun

Because I’m curious, I wanted to know what Stora Dimun meant. Stora was clear, almost the same as in Norwegian meaning the bigger or the larger. I searched the web for Faeroese dictionaries to reveal the Dimun name. No luck.

Then I found amazing pictures of the real Stora Dimun. Go have a look.

I want to sit on the edge of that cliff and spindle a thread until the spindle reaches the sea. Just ignore the fact that I’d need really long arms to do that.

Catching up

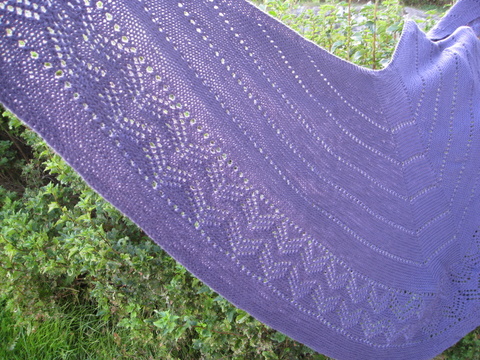
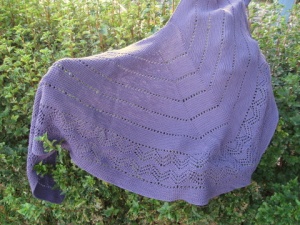
Pattern: Stora Dimun (Ravelry link) from Folk Shawls by Cheryl Oberlee

Yarn: Dale of Norway Lerke, colour 5063,  maybe 8  skeins. Or 9?

Needles: not sure, might have been 3.5 mm??

See? Without blogging I completely loose track of what I’m doing. There is a lot of catching up to do, although it won’t be a significant loss to mankind if some projects slip under the blog radar, accidentally or not. Don’t let the greeneries fool you, the shots have been in my camera since July or so. Feels like a different world.

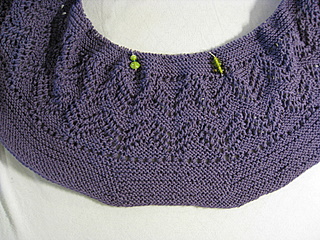
I’m glad to report I finished the shawl from two posts ago, and that it is a nice pattern even if the start (cast on for the outer edge, you have to ba able to count to fivehundredandsomething) is rather intimidating. Once the lace pattern is established it is a straight forward knit. And a Big Knit! The shawl is huge and blocked even bigger but drapes wonderfully. It wasn’t until  the 7th skein or so that the rows actually felt shorter.

I really like the style of the Faroese shawls and would love one for myself as I often throw a shawl over my shoulders when the office is chilly. I have my eyes on the Faroese Shawl from a Gathering of Lace. One day..

The shawl was a gift to a friend when she had her first child. A shawl for mama, a blanket for baby.

My standard stripey baby blanket in 150 g 2ply merino, cast on 150-170 sts on 6 mm needles and knit until the yarn is out. I had a little accident with this ine, I wanted to full it just a bit. I should know from previous experience that fulling in the washing machine is no exact science, and it came out uneven and sticking to itself in soe areas. Luckily this was one of the rare cases where a good soak in conditioner and a severe block fixed most of it, and the recipient clearly didn’t have to worry about putting a handknit through wash and use!

The sun is back.

And I have new yarn.

Piece of Vermont merino/bamboo/nylon sock yarn,clockwise from lower left the colours are Pixie Dust, Late October, Sapphire and Cinnamon Toast.

Jessie has now closed her online shop, but there is hope an Etsy shop will be up supplying us with more coloured goodies. Meanwhile my stash should last me sometime. Actually I think it will last for so long time that I have decided to not buy yarn buy very little yarn for a while. This yarn was ordered in 2009 so it doesn’t count. I love mail!

Oh, and apparently I’m blogging again. It feels good to be back!

img_0685

I wasn’t intending to make a bedspread either but think I’m on good way there. 5 balls of Dalegarn Lerke got me through the bottom border of the Faeroese shawl. I’m now at ball eight and still can’t stretch out all the stitches on my 100 cm needle.  I think this will grow a lot in the blocking too, the yarn being half cotton.

(Ings, your record for largest shawl knit by mistake is safe but I can still hear you laughing.)